|
<< Click to Display Table of Contents >> Create a New Supplier Record |
  
|
|
<< Click to Display Table of Contents >> Create a New Supplier Record |
  
|
Overview:
The Supplier window contains all the data that has been entered into the iTMS system in relation to the Supplier.
To access the ‘Supplier’s’ window, open the Core Data module, click on the ‘Suppliers’ icon and in the “Supplier Code” field enter a code. Press <TAB> to advance to “Supplier’s Name” field and type in the name of the new supplier. Press <TAB> or click in the information boxes to enter the date, supplier's phone and fax number and A.B.N. The "Employee Name" field is the employee entering the client's information. To fill this field, enter the employee number or click in the blue field under "Employee Name' and press <F2> and select from the pop-up list then click OK. Ensure to click on the 'Active' box to make the new supplier active. The ‘QA – Approved’ tick box is for the purpose of internal quality assurance approval. If the supplier’s product and service was to the company’s level of standard, then the box would be ticked. Enter the supplier’s email address and web site information and continue to enter the supplier’s details.
Where a blue field is encountered, (except for the ‘Supplier Code’ when creating a new suppler), press <F2> and select from the pop-up list and click OK. These field have been pre-set via the parameter settings. The contact details for the supplier’s representatives are entered in the fields on the bottom of the tab. To enter these details click in the field and enter information or press <F3> to edit the details, press <TAB> to continue to next field.

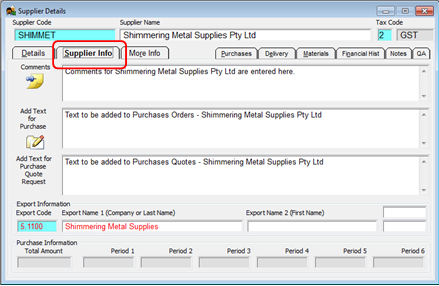
The “Supplier Info” tab - enables the user to record text to be displayed on purchase orders and purchase quotes for the supplier.
The Supplier’s ‘Export Name’ is automatically entered when the supplier name field is completed on the Details tab. Enter the export account code in the “Acc Code” field, this account code must be the same code used in iTMS and MYOB/QuickBooks. Ensure that there are no extra spaces in or after the supplier’s name as this will cause errors when exporting data.

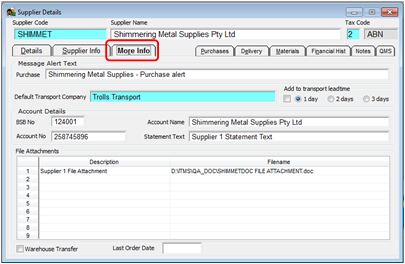
The “More Info” tab - The “Message Alert Text” field creates a pop-up message that will appear displaying the text entered here, whenever a Purchase Order is created for the supplier. The user can also select a “Default Transport Company” and add lead-time to transport. The supplier’s bank account details are also entered on this tab. The “File Attachments” area enables the user to attach files in relation to the supplier for quick viewing.
To attach a file – click on the first available line in the “Description” table and type in a description for the file or document, press <TAB> to move to the “Filename” area. Press <F2> or Dbl-click to browse your computer system for the required file. Click on the file to highlight and then click on Open. To view the attached file, go to the ‘Details’ tab and click on the View Attached file button ![]()

The other tabs in the Supplier window do-not require the user to enter any data. These tabs collect data via other functions within the system.
| • | The Purchases tab displays the current and/or past material purchases and all the purchase orders for the supplier. |
| • | The Delivery tab displays all the purchase deliveries for the supplier. |
| • | The Materials tab displays all the materials purchased from the supplier. |
| • | The Financial Hist tab displays a four year history of purchases for the supplier |
| • | The Notes tab displays all the ‘Contact Relation Management’ records in relation to the supplier and/or their products. |
| • | The QA tab displays all the quality assurance records for the supplier. |
Last Revised: 15/12/2011