|
<< Click to Display Table of Contents >> Create a New Quote |
  
|
|
<< Click to Display Table of Contents >> Create a New Quote |
  
|
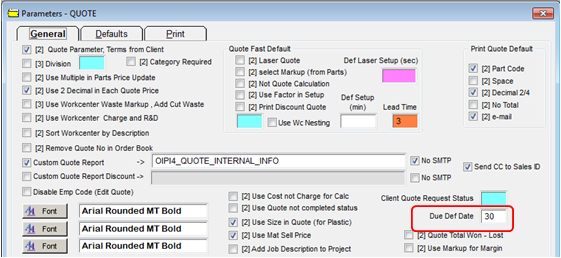
Set-up the “Date Valid” field on the Quote - select ‘System Codes’ from the Toolbar and then click on ‘System Parameters’ on the bottom of the drop-down. Click on ‘Parameters – QUOTE’ on the extended list, to open the Parameters – QUOTE’ window. Enter the number of days for which the quote is to be valid in the “Due Def Date” field (circled) and press <F9> to save.

To create a Quote - Open the Quotes Module, click on ‘New Quote’ option to display the ‘Quote – 1 - <New Entry>’ window. In the “Client Code” field, press <F2> and select the client from the pop-up list, then click OK. Press <TAB> to display the “Client Name”. Press <TAB> to move to the “Job Description” field, and type in a brief description of the item in relation to the quote. Press <TAB> to proceed to the “Date Issued” field, the current date will be entered, change if necessary. Press <TAB> to move on to the “Date Valid” field, if this has been set-up it will fill automatically. Press <TAB> to move forward to the “Date Required” field, and type in the date. Press <TAB> to proceed to the “Attention” field press <F2> and select the client’s contact person from the pop-up list and click on OK. Press <TAB> to move to the “Emp No” field and either enter your employee number or press <F2> and select an employee from the pop-up list then click on OK. This employee field is usually the employee creating the quote. Fill remaining fields if necessary. Press <TAB> to progress to the “Part Code” field, press <F2> and a Message will pop-up asking if you wish to select a part or materials. Click on either the Parts or Material button, for this example Parts and then Materials have been chosen.

Select required parts or materials from the pop-up list and then click on OK.

Adjust the quantities where necessary and press the <TAB> key to move to next field, check prices are correct, remembering to <TAB> out of each field. Press <F9> to save the Quote.

Quote window buttons
![]() = View the Details for this Client
= View the Details for this Client
![]() = Update the ‘each price’ after changing quantities, mark-ups, or workcenter charge rates. Note: This can only be used when using parts in a quote.
= Update the ‘each price’ after changing quantities, mark-ups, or workcenter charge rates. Note: This can only be used when using parts in a quote.
![]() = View the Attached Drawing File for this Part
= View the Attached Drawing File for this Part
![]() = Update Part record with Prices Below
= Update Part record with Prices Below
![]() = Preview the Scheduling
= Preview the Scheduling
![]() = Export List to Microsoft Excel
= Export List to Microsoft Excel
![]() = Print
= Print
![]() = Enter More Information (More Info tab)
= Enter More Information (More Info tab)
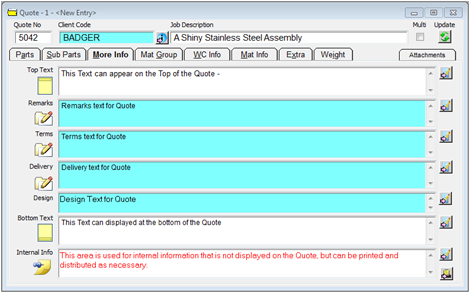
The More Info tab has areas to enter text to be displayed on the quote and also an area for internal information.

The Attachment tab can be used to attach drawing and or instruction in regards to the quotes. To attach a file, type a description of the items in the “Description” area. Press <TAB> to advance to the “Filename” column and press <F2> to browse your computer to find the file. Click on the required file to highlight and click on Open. The file path will now be recorded in that area. To view the attached file click on ![]() button on the “Parts” tab.
button on the “Parts” tab.

The other tabs display information automatically generated by the data entered into the system in relation to the areas of the tabs.
Last Revised: 09/01/2012 SJ