|
<< Click to Display Table of Contents >> Discounts and Pricing |
  
|
|
<< Click to Display Table of Contents >> Discounts and Pricing |
  
|
Overview:
Note: A USER MUST be logged on as the USER - admin to set system parameters unless they have been granted permissions for their USER number.
Quote |
Client Order |
Production Order |
TYPE |
VERIABLE |
PARAMETER |
FIELD |
PART |
MATERIALS |
√ |
√ |
X |
1. Category Sell Price Discount |
Sell Price |
√ |
|
√ |
√ |
√ |
√ |
X |
2. Client Dependant Discount/Factor |
Discount |
|
|
√ |
√ |
√ |
√ |
|
3. Category Sell Price Fixing |
Sell Price |
√ |
|
√ |
√ |
|
√ |
|
4. Quantity/Client Sell Price Fixing |
Sell Price |
|
√ |
√ |
x |
1. Category Sell Price Discount
Set-up
Click on System Codes on the toolbar and then click on ‘Clt/Sup/WC/QT Categories’ option from the drop-down menu. The ‘Categories for Clients/Suppliers/Workcenters/Quotes’ set-up window appears.
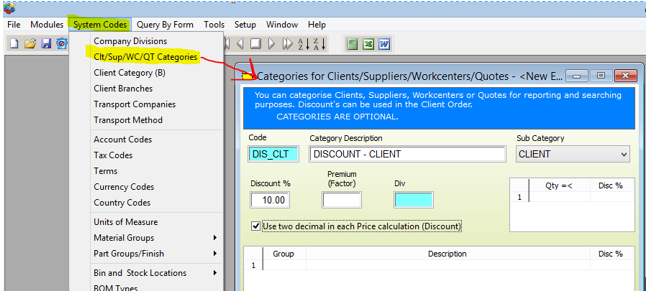
This is the “Cat A” field in the ‘Client Details’ window – the USER can apply a discount for this field. Enter a code for the discount in the “Code” field and press <TAB> to advance to the “Category Description” and type in the description for the discount. Click on the “Sub Category” drop-down menu and select “CLIENT” from the list, click in the “Discount” field and enter the appropriate amount in percent, press <F9> to save.
Click on System Codes on the Toolbar, select ‘Systems Parameters’ from the bottom of the drop-down menu. Click on ‘Parameter – INVOICE’ from the extended menu list to display the ‘Parameters- Invoice’ window. Click in the “(2) Factor, Discount” box to tick, (Note: this is a 2 stage tick box, no tick = Factor, ticked = Discount), press <F9> to save.

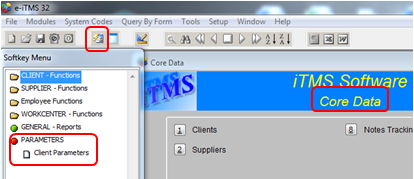
Open the Core Data module and click on the ‘Soft-key’ on the Toolbar to access the soft-key menu (. Dbl-click on the ‘PARAMETERS’ option and then dbl-click on ‘Client Parameters’ to open the parameter window. Note: The USER MUST have permission to set the parameter settings.
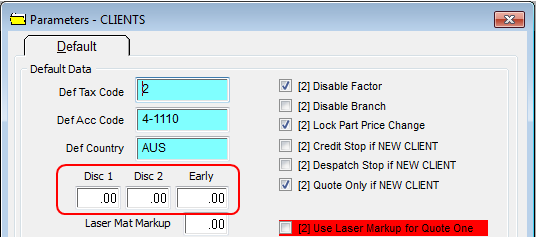
Enter the Default discounts amounts to zero or an amount as required, press <F9> to save.
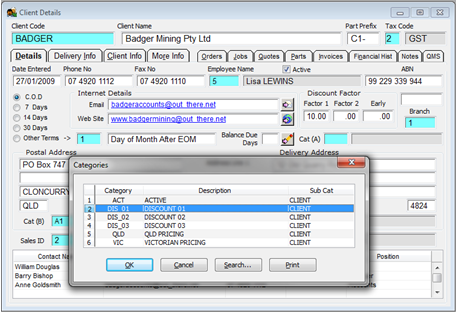
Return to the Core Data module and click on the ‘Clients’ icon to open the ‘Client Details’ window. In the ‘Client Details’ window type in the client code or press <F2> and select the client from the pop-up list, click on OK and press <TAB> to generate the window. Click in the “Cat (A)” field and press <F2> to display the Categories pop-up list. Click on the appropriate category to highlight and click on OK. Press <TAB> to generate the field and press <F9> to save.
Create a Quote and/or Client Order.
Create a New Quote/Client Order as normal, enter parts and/or materials, discount is applied automatically to all parts and materials. Press <F9> to save.

2. Client Dependant Discount Factor
Set-up
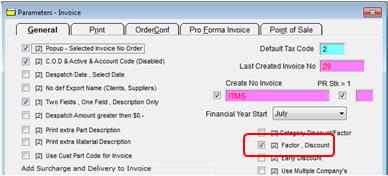
Click on System Codes on the Toolbar, select ‘Systems Parameters’ from the bottom of the drop-down menu. Click on ‘Parameter – INVOICE’ from the extended menu list to display the ‘Parameters- Invoice’ window. Click in the “(2) Factor, Discount” box to tick, (Note: this is a 2 stage tick box, no tick = Factor, ticked = Discount), press <F9> to save.
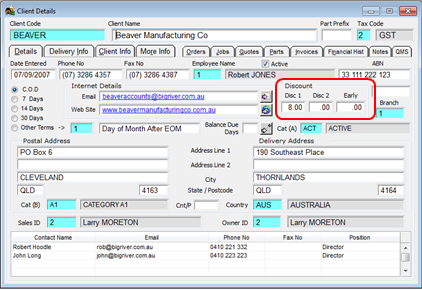
Open the Core Data module and click on the ‘Clients’ option to display the ‘Client Details’ window. In the ‘Client Details’ window type in the client code or press <F2> and select the client from the pop-up list, click on OK and press <TAB> to generate the window. Click in the “Disc 1” field and type in the discount amount, press <F9> to save.
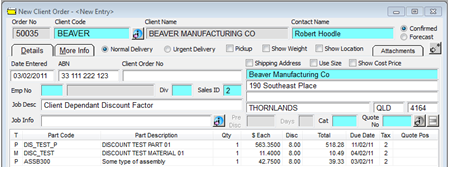
Create a Quote and/or Client Order.
Create a New Quote/Client Order as normal, enter parts and/or materials, discount is applied automatically to all parts and materials. Press <F9> to save.
3. Category Sell Price Fixing
Set-up
Click on System Codes on the toolbar and then click on ‘Clt/Sup/WC/QT Categories’ option from the drop-down menu. The ‘Categories for Clients/Suppliers/Workcenters/Quotes’ set-up window appears. Enter a code for the fixed sell price in the “Code” field and press <TAB> to advance to the “Category Description” and type in the description for the fixed price. Click on the “Sub Category” drop-down menu and select “CLIENT” from the list, Press <F9> to save.

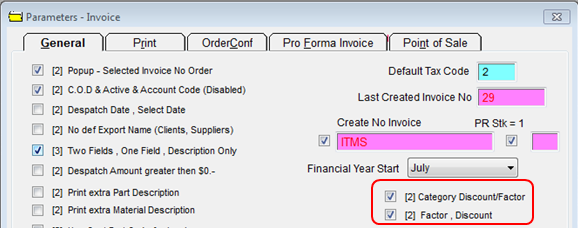
Click on System Codes on the Toolbar, select ‘Systems Parameters’ from the bottom of the drop-down menu. Click on ‘Parameter – INVOICE’ from the extended menu list to display the ‘Parameters- Invoice’ window. Click in the “(2) Category Discount/Factor”, and press <F9> to save.
Open the Core Data module and click on the ‘Clients’ option to display the ‘Client Details’ window. Click in the “Cat (A)” field and press <F2> to display the Categories pop-up list. Click on the created or appropriate category to highlight and click on OK. Press <TAB> to generate the field and press <F9> to save. The user would set this field for all clients that are entitled to this price.

Open the Manufacturing module and click on the Parts option and either create a new part or use an existing part. If using an existing part, press <F2> and select the appropriate part from the pop-up list and click OK. In the “Category” field, press <F2> and select the appropriate category from the pop-up list and click OK. Press <TAB> to advance to the “Price” field and enter the price for that category, press <F9> to save.
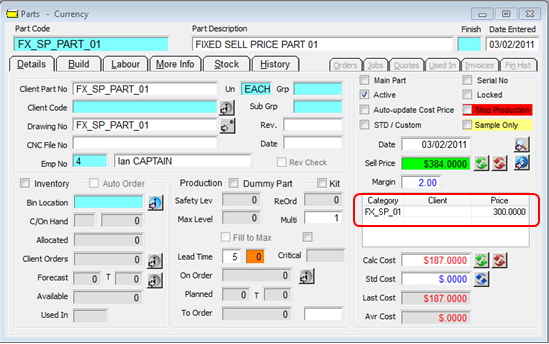

Create a Quote and/or Client Order.
Create a New Quote/Client Order as normal, enter parts and/or materials for the fixed sell price. The special price is applied automatically to the Quote/Client Order.

Press <F9> to save.
Quantity/Client Sell Price Fixing. (Part Only)
Set-up
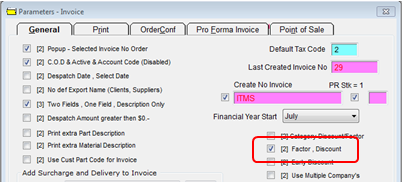
Click on System Codes on the Toolbar, select ‘Systems Parameters’ from the bottom of the drop-down menu. Click on ‘Parameter – INVOICE’ from the extended menu list to display the ‘Parameters- Invoice’ window. Ensure the “(2) Category Discount/Factor” option is NOT ticked, press <F9> to save.
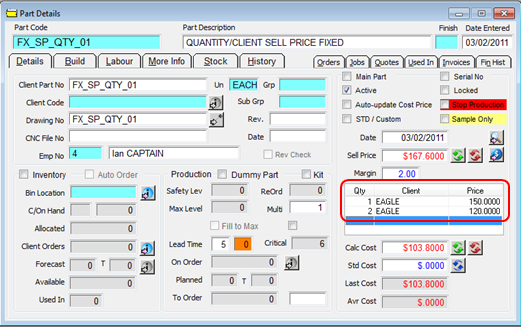
Open the Manufacturing module and click on the Parts option and either create a new part or use an existing part. If using an existing part, press <F2> and select the appropriate part from the pop-up list and click OK. In the “Qty” field enter the quantity, press <TAB> to advance to the “Client” field. In the client field type in the client code Press <TAB> to advance to the “Price” field and enter the price for that Client, press <F9> to save.
Create a Quote
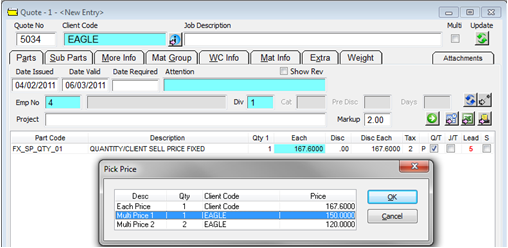
Create a New Quote as normal, enter parts for the fixed sell price, and press <TAB>. The price does not automatically change, the user must press <F2> and select the price from the “Pick Price” window and then click OK. Note: This feature is for Parts only.
Create a Client Order.
Create a New Quote/Client Order as normal, enter parts and/or materials for the fixed sell price. The special price is applied automatically to the Quote/Client Order.
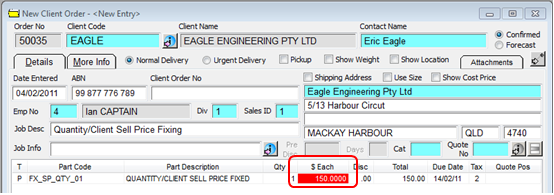
Press <F9> to save.
Last Revised: Under Review SJ