|
<< Click to Display Table of Contents >> Notes System Set-up |
  
|
|
<< Click to Display Table of Contents >> Notes System Set-up |
  
|
Overview:
“Notes” entries in the iTMS system are a traceable and actionable records created in relation to the following:
| • | Client |
| • | Suppliers |
| • | Employee |
| • | Workcentres. |
Notes can be used as CRM (Customer Relations Management), HR (Human Resources)and PM (Preventative Maintenance) tools and enable centralising of company information within the iTMS system.
1. Creating Notes Categories
Before the user can create Notes Record, categories and sub-categories must be created to be assigned to the records. It is mandatory to assign a category to every Note record, so at least one category must be created. These categories are used for classifying and searching the ‘Notes’ Records.
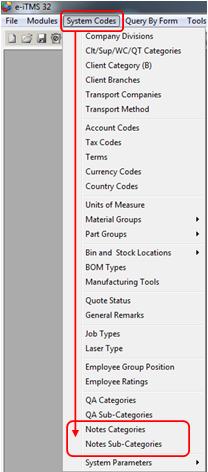
Click on 'System Codes' on the Toolbar to display the drop-down menu and click on 'Notes Categories'.

The 'Notes Categories' window appears, click in the "Code" field and enter a code, press <TAB> and then enter a description. Select an area in relation to your category from the drop-down list, see example below. Press <F9> to save the category entry. Continue to create categories as required. Sub Categories can be assigned to a Parent Category in the table on this window. The Sub Categories can also be edited or deleted from this window

2. To create the sub-categories – click on ‘System Codes’ and select 'Notes Sub-Categories' from the drop-down list, click in the "Code" field and enter a code, press <TAB> to move to the “Category Description” field and type in a description. Click in the "Parent Category" field, press <F2> and select a parent category from the pop-up list and then click OK. These category codes now are linked, press <9> to save the Sub-Category. Continue to create the sub-categories and allocating them to their parent code, press <F9> to save each entry. See examples below. Click on the tick box as shown below if action is automatically required for any or all of the sub-categories, , press <F9> to save.

3. Subject/Information Tabs
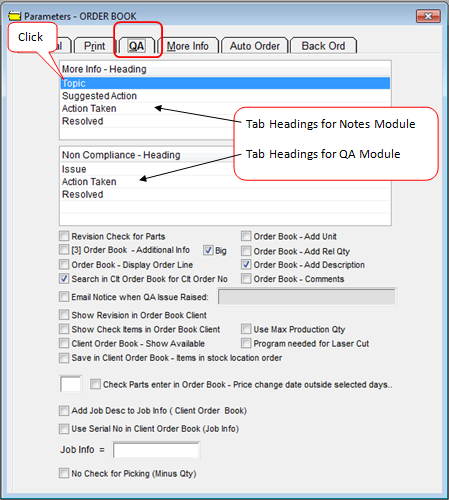
The Notes Tracking System window may be customised and the tab names can be changed to suit company requirements. Up to 5 different subject tabs can be created depending on a company's quality procedures. See example below. The Subject/Information Tab names are edited from within the ‘Order Book Parameters’.
To Rename Subject/Information Tabs
Click on 'System Codes' on the toolbar and selecting 'System Parameters' from the bottom of the drop-down list, then from the extended list select 'Parameters - ORDER BOOK' and then click on 'Parameters – ORDER’ to open the parameters window. Click on the “QA” tab and click on the name of the tab the user wants to change - press <F3> to edit, and type in the new name for that tab (See example below), continue to change the tab names as required - press <F9> to save.

Last Revised: 29/02/2012 SJ