|
<< Click to Display Table of Contents >> Emailing Files attached to a Part within a Quote |
  
|
|
<< Click to Display Table of Contents >> Emailing Files attached to a Part within a Quote |
  
|
This document describes how to set up a workstation/PC to enable files to be attached to parts, and also to view and automatically attach the file to an email when sending a quote containing the part.
Click on Setup on the Toolbar and select ‘Station Default’ from the drop-down menu. Ensure that the workstation the user is attempting this set-up on is the station/PC name displayed in the “Station ID” field (circled below).

Click on the OK button to save the set-up – a message will appear (see below) click on OK.

Click on Setup on the Toolbar again and select ‘Station Setup (Email)’ for the dropdown list and check that the “Use SMTP Server” box is NOT ticked, then click on OK.

Log off iTMS and log back on again, this must be done on any workstations/PC when this feature is set-up.
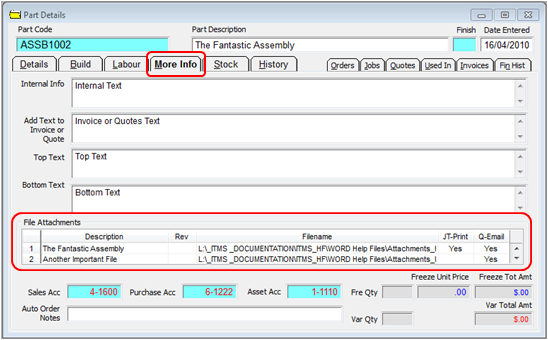
Open the Manufacturing module and click on the ‘Part Details’ icon, enter the required part code or press <F2> and selected the part from the pop-up list, click on OK and then press <TAB> to generate the window. Click on the “More Info” tab to open and click in the “Description” field in the “File Attachments” table. Type in a description for the file and press <TAB> to advance to the “Rev” field. Enter revision information if required and press <TAB> again to move to the “Filename” field. Press <F2> or dbl-click to browse to the location of the file the user wishes to attach to the part record. Click on required file and then click on the Open button to attach the filename and path to the part record. Press <TAB> to move to the “Q-Email” field and enter ‘Yes’, repeat to attach more file if necessary. If more than one file is attached to the part for emailing with a quote press <F9> to save. Note: The “JT-Print” field refers to Job Ticket/s.

To email the Quote and the attached file/s – open the Quotes module and click on the ‘Print Quote’ icon. In the Print Quote window, click in the “Email this Quote” box to tick and click on the Print button.

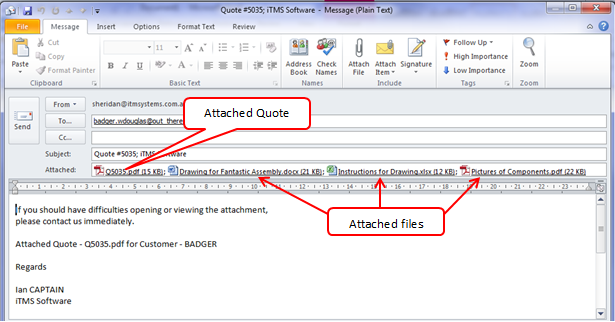
The Print Preview window opens and then an email addressed to the client with the quote and the Drawing file attached, send the email as normal.

Last Revised: 22/03/2012 SJ