|
<< Click to Display Table of Contents >> Production Order - Make to Stock |
  
|
|
<< Click to Display Table of Contents >> Production Order - Make to Stock |
  
|
Step 1 – Select Parts to make and Create Job – 2 options
Option 1 – Use the Parts Auto order function and Option 2 – Open a new Production Order and add Parts Manually
Option 1 – Use the Parts Auto Order function
Open the Order Book module and click on the Soft-key icon on the Toolbar, dbl-click on the ‘Production Order Functions’ to display the menu list. (The Order Book module must be open to access the correct Soft-Key menu).
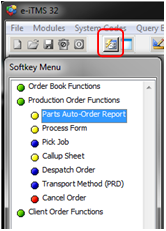
Dbl-click on the ‘Parts Auto – Order Report’ option to open the ‘Parts Auto Re-Order List’ window. Click on the “Overall” radio button to populate the list. The window will show all parts that have been allocated to client orders and all Sub Parts that have been allocated to Production Orders. The report can be refined by selecting what you want the report to show via the “Show” radio buttons on the top left of the screen.

Select the quantity to add to a production order by clicking onto the required amount. The selected amount can be added to a production order by a right-mouse-click and selecting “Add Parts to New Production Order” from the pop-up list. A production order will be opened and the parts and quantities added to the order automatically.

Option 2 – Open a new Production Order and add Parts Manually
Note: the word “STOCK” must be selected in the “Client Code” field and “ST” or “PR” in the “Type” field.
When the parts have been entered into the order either with Option 1 or Option 2, check availability of stock:
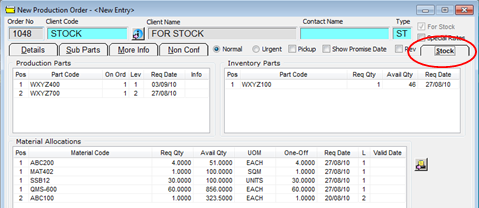
Check stock availability for the order by opening the “Stock “ tab, which displays the Production Parts, Inventory Parts, and Material required to build this order.
1. Press <F9> to save the order.
2. The order is saved and a message will notify of the allocations. The “Process Sheet” window opens, click on the ‘Create Job Tickets’ icon.

3. Click on the ‘Print Job Ticket(s)’ icon and the “Print Job Ticket” window opens. Click on the Print button to open the ‘Print Preview’ window and then click on the Print icon at the bottom left of the screen. Job tickets can be edited within the ‘Process Sheet’ window by selecting the ‘Edit Job Ticket’ option.
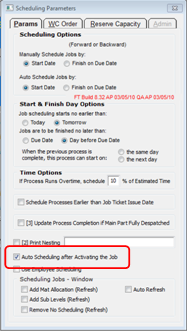
4. Click on the ‘Activate Job’ icon to enable time recording and to automatically schedule job into the system. The Auto-Scheduling Parameters must be enabled – click on ‘System Codes’ and then click on ‘System Parameter’ from the bottom of the drop-down list. Click on ‘Parameter – SCHEDULING’ from the extended list to display the ‘Scheduling Parameters’ window. Click on to tick the box as shown below.
Step 2 – Check Job Material and Parts Allocations
1. In the Process Sheet click on the item “3.1 Assess Job Picking and Stock Reservations” to view inventory material and part allocations for each job ticket on this order. Dbl-click on line items to see full detail. If the “Show All” box is ticked, all the job ticket allocations are displayed when the selected job ticket line is Dbl-clicked.

2. The Planner may use this information to analyse stock availability and purchasing
requirements.
3. Close the ‘Allocations for Job Ticket #’ window and right-mouse-click on line item (as shown below) – select “Job Picking #”

4. Picking window will take material/parts from stock and book against this job number.
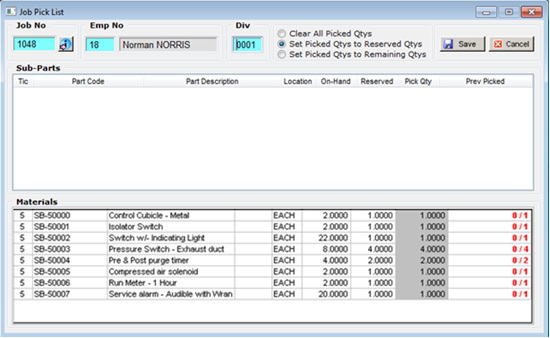
5. The Job allocation window has updated the status to “Picked”.

6. The balance of materials and parts should be purchased and picked to complete the job and ensure correct job costing. Alternately, the complete job can be picked by selecting “3. Pick Materials and
Sub-Parts” from the ‘Process Sheet’ window.
Step 3 – Print Job Tickets
| 1. | From the ‘Process Sheet’, click on “3.1 Assess Job Picking and Stock Reservations” option to display the “Check Job Ticket Allocations” window. Print the Job tickets that are ready to be started by clicking in the ‘To Do’ column, then click the far right Print button (circled) and follow the prompts. |

The Print Preview window opens displaying the job ticket. If drawings are attached, a message window will appear, see below.
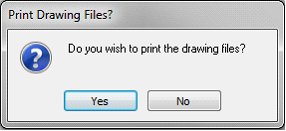
Click on either Yes or No and then another message pops up, again click on either Yes or No.

Then click on the Print button on the bottom left hand side of the ‘Print Preview’ window to print the Job Ticket/s and any attached drawings.
![]()
Last Revised: 02/04/2012 SJ