|
<< Click to Display Table of Contents >> Create a New Purchase Order |
  
|
|
<< Click to Display Table of Contents >> Create a New Purchase Order |
  
|
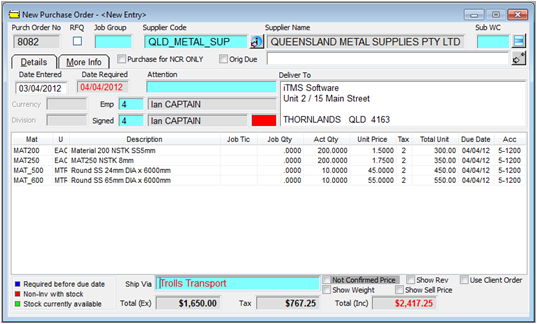
From the Command Centre, open the Purchase module and then click on the ‘New Purchase Order’ icon to display the “New Purchase Order - <New Entry>” window.
Click in the “Supplier Code” field, press <F2> and select the supplier from the pop-up list then click on OK and press <TAB> to display the suppliers name. Press <TAB> to advance to the “Date Entered” field and the current date will appear, press <TAB> to advance to next field. In the “Attention” field, press <F2> and select name from the pop-up list and click OK. Press <TAB> again to advance to the “Deliver To” field and a message appears. For this example we will click on Default.

Click in the “Emp” field, press <F2> and select the name of the person requesting the materials be ordered. The “Signed” field is controlled by a parameter setting which will require a user with permission and an internal employee password to release the purchase order. Press <TAB> to advance to the “Currency” field (if activated), press <F2> select from the pop-up list and click OK. Press <TAB> again to advance to the “Mat” column –
Materials Search in Purchase Orders: In the Material code field (“Mat”) use the following search functions
1. <F2> will pop up list of all material in the Database – Care should be taken depending on the size of the material database as the list could be large
2. ABC to select materials beginning with Material Code “ABC” from 'Popup list'.
3. >XYZ to select materials with a Supplier Material Code containing “XYZ”
4. >> Dexion to search by the Supplier Material Description that contains the word ‘Dexion'
5. /Flat to search the Material Description containing the word ‘Flat’
6. ?10 to search for materials belonging to Material Group “10”
7. // to search for Materials classified as “Auto Order”
8. ?? to search for Parts to enter in purchase order
9. >//ATLAS to search for Materials where ATLAS is a supplier
Once materials have been selected, press <TAB> to move on to the “Job Tic” field. If purchasing directly to a job ticket, press <F2> and select relevant job ticket from the pop-up list and click OK. Add the job quantity and actual quantity to be ordered.

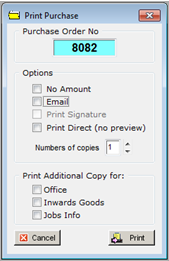
Add a transport method if necessary and press <F9> to save. The ‘Print Purchase” window appears, tick boxes as required and then click on the Print button to print the Purchase Order or click on Cancel if not required to print.

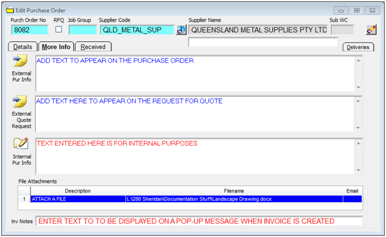
The “More Info” Tab allows for text to be added to print on purchase orders and requests for quotes. File can also be attached to the purchase via this tab. At the bottom is a field where text can be entered to create a pop-up Note message when a user attempts to create the purchase invoice.

The “Received” Tab records deliveries, the delivery information, the job for the delivery information and any outstanding deliveries can be printed from this tab. There is also an information button that opens a screen where delivery information can be edited.
The “Delivery” Tab shows the goods that were delivered for the Purchase Order and the quantity.
Last Revised: 03/04/2012 SJ