|
<< Click to Display Table of Contents >> Managing Employee Sick leave - Part day event |
  
|
|
<< Click to Display Table of Contents >> Managing Employee Sick leave - Part day event |
  
|
Overview:
This document describes how to manage sick leave when the employee clocks off early for the shift. Never edit an employee record on the day of the issue; this is to ensure that all the necessary time is allocated to the record. A Non-productive Part, Workcenter will need to be set-up, and a Production Order with a Job Ticket will need to be created for sick leave. Please see ‘Setup and Utilise Non-productive Time’.
Scenario – Employee number 11 Joel Johnstone clocks on as normal for the day. As the day progresses he find he is unwell and cannot continue to work. He clocks off the job he is doing and he clocks off for the day. The following day, the user responsible for maintaining employee clock records will create a ‘Job Batch – Time Entry’ for the time to be allocated to Sick Leave for the employee 11 Joel Johnstone’s shift. This time will be allocated to a Non-productive Part, Workcenter and job ticket.
Open the Personnel module and click on the ‘Show Daily Employee’ icon. Enter the required date or use the calendar button and select the date in the ‘Select Date’ pane.

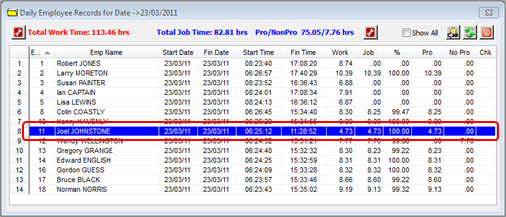
The employee records for the selected date are displayed in this window.

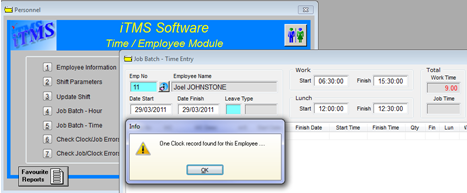
Dbl-click on the employee who took sick leave – Employee 11 Joel Johnstone, this opens their Time Clock record for the required date. Take note of the finish time on this record as this will be entered onto the Job Batch entry to record the sick leave. Close the ‘Employee Time Clock’ record, and the ‘Daily Employee Records’ window. In the Personnel module, click on the ‘Job Batch – Time’ icon, to open the record. Enter the employee number and then press <TAB>, a message appears to say a clock record for the employee has been found, click OK.

Close any ‘Employee Time Clock’ records that may appear. In the ‘Job Batch – Time Entry’ window, edit the date fields to the required date, the message above will appear again. Click OK and close the ‘Employee Time Clock record. Click in the “Leave Type” field, press <F2> and select the code for ‘Sick Leave’ from the pop-up list, click OK and press <TAB>. Edit the “Work Start” field, this start time will be the time the employee clocked off on the day of the sick leave, whereas the finish time, is the normal time the employee clocks off of the shift, so this stays the same. If the employee is setup for Auto Lunch, do not edit the “Lunch Start or Finish” fields. If the “Lunch” fields are blank, leave them blank.

Click in the “Job No” field, press <F2> and select the appropriate job ticket for the sick leave and click OK. In the “WC” field, press <F2> and selected the code for the Sick Leave workcenter and click OK. A Message appears, click OK.

The “Date” and “Start Time” fields will generate, click in the “Finish Time” and enter the normal finish time for the employee. Press <TAB> to move to the “Lunch” field and enter the time in minutes for the normal lunch break entitlement for the employee.

When the time comes to print the Payroll Report for that period, the times are allocated accordingly.

Last Revised: 05/04/2012 SJ