|
<< Click to Display Table of Contents >> Microsoft Word Email Merge from iTMS Query Data |
  
|
|
<< Click to Display Table of Contents >> Microsoft Word Email Merge from iTMS Query Data |
  
|
Overview:
ITMS has a Mail Merge feature to enable the user to create a merge of a Microsoft Word® document to email. The data source for the mail merge is created by running a query in ITMS. A Microsoft Word® Document to be converted to email merge is created and save previous to the following instructions.
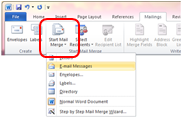
Open a new Microsoft Word® document and click on the ‘Mailing’ Tab and select “Start Mail Merge” option and select “E-mail Messages” from the drop-down list. Create your email document and save as normal.
Step 1. The user must run a Query, please see Initiate and Run a Query in this chapter for in-depth instruction on running queries. Because this is an email merge the fields with clients or supplier’s email addresses are used to create the required query report.
For this example, I will use the Contacts fields in the ‘Client Details’ window. Open the Core Data module and click on the ‘Clients’ option to open the Client Details window. Press <F11> on your keyboard and then enter <>” in the “Email” field and press <F12>. This will display all the client records with data in this field.

The query will display all the client records with data in this field.
Step 2. With the query open, click on ‘Setup’ on the top Toolbar and then select ‘Export’ from the drop-down menu. Enter the Export Name for your query - the File Name can be the same as the Export Name. Scroll through the list to find the required field name, click on the field to highlight and click on the top green arrow to add the field name. The Fields added for this example: CLIENT_NAME (Company Name), CONTACT_NAME (Contact on the top of the list), EMAIL (Email for the Contact on the top of the list).
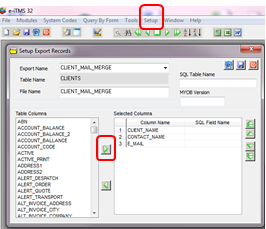
Click on the Save icon at the top right of the window (circled above).
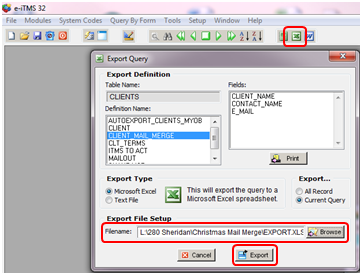
Step 3. Click on the Microsoft Excel® icon (circled below) and select the query name from the “Definition Name list. Click on the Browse button and locate the folder to save the query file, name the file and click on the Save button, and then click on the Export button.
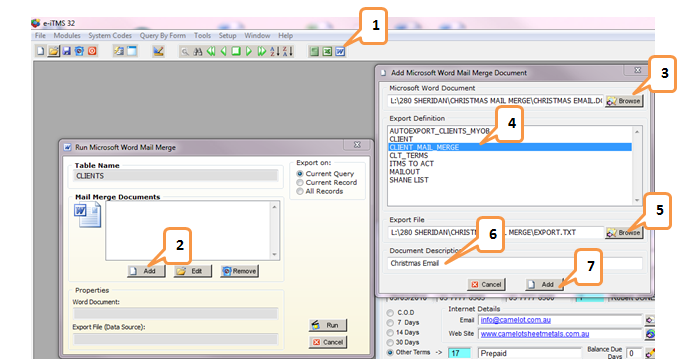
Step 4. In ITMS with the query still open,
1. Click on Microsoft Word® button to open the ‘Run Microsoft Word® Mail Merge’ window.
2. Click on the Add button, the ‘Add Microsoft Word® Mail Merge Document’ window appears.
3. Click on the top Browse button to locate the Microsoft Word® Document created for the email earlier, you may need to use the drop-down menu to select “All Files (*.*)” click on the File and click on Open.
4. Click on required “Export Definition” to highlight.
5. Very Important - Click on the lower Browse button to locate the Excel file from the Query (data source). Keep the same name as the saved Excel file but add the file extension .txt to the file name and then click on Save.
6. Enter the ‘Document Description’
7. Click on the Add button to generate the 'Run Microsoft Word® Mail Merge' window.
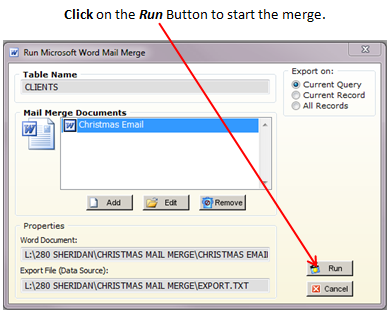
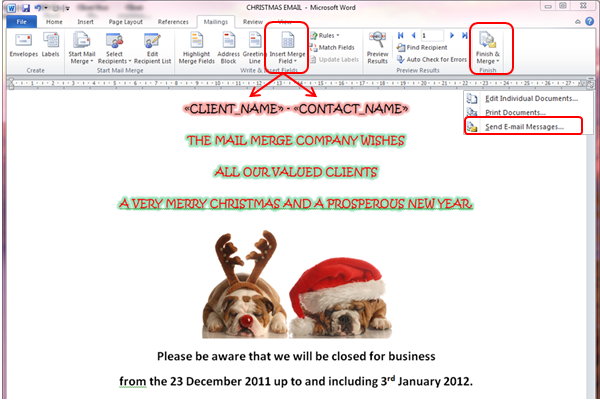
Step 5. The Data Source window will open, click on OK and then the document opens. Click on “Insert Merge Field” and enter the appropriate fields onto the document (e.g. CLIENT NAME and CONTACT NAME). This text font can be change to match the rest of the email text. Click on “Preview Results” button if necessary and click the forward &/or backwards arrows to view. Click on the “Finish & Merge” button and select “Send E-mail Messages” from the drop-down list.
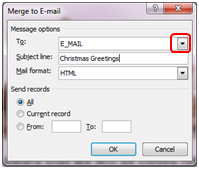
The ‘Merge to E-mail’ window opens, click on the “To:” drop-down arrow and select “E_MAIL” from the list. Type the subject information in the “Subject Line” field and then click on OK.
The emails are automatically sent to all the clients in the list.

Last Revised: 25/11/2011 SJ