|
<< Click to Display Table of Contents >> Quality Assurance Module Set-up -Version 8 only |
  
|
|
<< Click to Display Table of Contents >> Quality Assurance Module Set-up -Version 8 only |
  
|
Overview:
The Quality Assurance module in iTMS is used to record issues that relate to Quality Assurance or Non-Conformance with regards to orders and jobs. The module allows for issues to be quickly and easily entered, resolved and finalised, with complete tracking along the way.
Quality Assurance issues can be attached in 3 ways: to an order (both client and production), to a job ticket or to a process within a job ticket. The nature of the issue will determine to which area the record is attached. For example, if a client was to change an order after production has begun, an issue may be raised against the order. If a problem was caused by an incorrect drawing for a part, an issue may be raised against the job ticket for that part. If a problem was caused by a defective tool within a workcenter, an issue may be raised against the process ticket for the part/s that was affected.
There is no limit on how many issues can be raised against an order, job ticket or process ticket. The more accurately assigned the issues are, the better the tracking and resolution can be. Company policy will dictate how and when Quality Assurance issues will be raised, resolved and finalised. By assigning issues to the specific area affected, better conclusions can be drawn that help to minimise the issues from occurring in the future.
Issues must also be categorised. These categories must be created by the user, and there is no limit on how many categories can be created. Creation of appropriate and meaningful categories allows searches to be more effective. It also allows quality assurance issues to be categorised by similar cause, similar resolution, or similar circumstance.
Setting Up the QA Module
1. Creating QA Categories
Before any Quality Assurance issues can be raised, categories must be created to assign to the issues. It is mandatory to assign a category to every issue, so at least one issue must be created. These categories are used for searching the Quality Assurance issues.
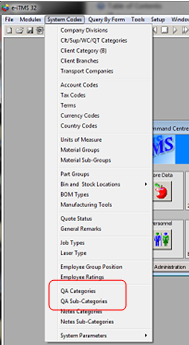
Click on 'System Codes' on the toolbar to display the drop-down menu and select "QA Categories". The QA Categories window appears.

Click in the "Code" field and type in a code, then press <TAB> to advance to the "Category Description" field and type your description, and press <F9> to save and repeat to enter more options. See example below.

2. Setting User Security
To ensure that only permitted users are able to use the Quality Assurance module, users must be given the correct permissions. The permissions for the QA Module are accessed in the 'Core Data' Module via the 'Employee' module, click on the 'Security' tab and tick the required boxes by clicking on them. The "Add NCR or ECR allows that employee to enter a new QA record
3. Setting Information Area Names
To allow the Quality Assurance module to be customised, the issue information tab names can be changed to suit company requirements. Up to 5 issue information areas (Tabs) can be created, depending on a company's quality procedures. See example below.

The Issue Information Areas (tabs) names can be altered from within the Order Book Parameters. These can be accessed by click 'System Codes' on the toolbar and select 'System Parameters' from the drop-down list, then from the extended list select 'Parameters - ORDER Book' and then 'Parameters - ORDER' the "Parameters - ORDER BOOK" window appears. Click on the 'QA' tab to open. Click on the line you wish to change and press <F3> to edit, type in the new name for that tab in the Quality Assurance module. See example below.

Last Revised: 02/07/2010 SJ