|
<< Click to Display Table of Contents >> Creating New Document Records in the QMS |
  
|
|
<< Click to Display Table of Contents >> Creating New Document Records in the QMS |
  
|
Overview:
Company documents such as Orientation documentation, Policies and Procedures, Health & Safety documentation, Training records, etc. can be linked to the Quality Management System (QMS). The QMS system enables companies to have easy access to all types of documentation in one convenient location. The Documentation component is protected and the user will need permission and an internal password to be able to access feature. This password is different to the password used to logon to iTMS. Please see ‘Setting up Password and Permission for Protected Functions’ in the Core Data chapter. Access the Quality Management System (QMS) via the Core Data module.
Open the Core Data module and click on the ‘Quality Management System (QMS)’ icon, and then click on the ‘Create New DOCS’ icon.

The ‘Create New Document’ window opens -
Enter your password, and click on the Next button, the system has identified the user from the password and the window extends. Enter a short summary/name for the document. The description the user enters here will be the name displayed in the “Show all Docs” window. Click into the blue field and press <F2> to select from the "Document Category" pop-up list, these would have been set-up previously. Click OK and then click on Next.

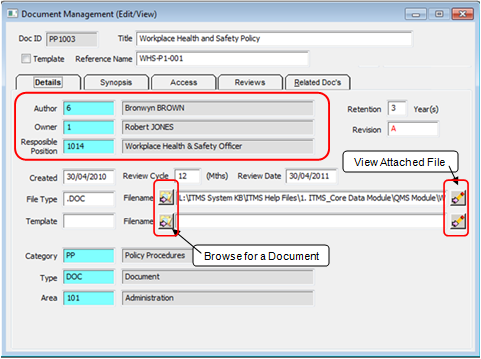
The “Document Management (New)” window opens - The blue fields are populated by clicking in the field and press <F2> to select a code from the different pop-up lists and then click OK. The “Author” and “Owner” fields are automatically generated with the user‘s employee number and name, this can be changed if not applicable.

The “Responsible Position field will also automatically generate and may be changed to suit the document. In the example below the document is a Workplace Health and Safety Policy so the author field has been change to employee 6 - Bronwyn Brown who holds the position of Workplace Health and Safety Officer. Type in the “Retention” and “Revision” fields and continue with the “Review” fields.

Click on the Browse for a Document icon to find the required document by browsing to its location on your computer system. Click on the document to highlight, and click on Open. The filepath to the document appears in the "Filename" field. A Template for the document may also be linked to this record. To enter a template, enter the type in the “Template” field and repeat the process for the document as above. The View Attached File button is used to open and view the document.
The “Synopsis” tab has an area to enter a summary of the document.

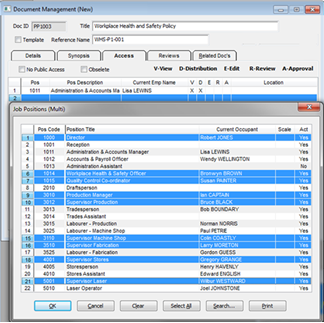
The “Access” tab is to record the employees that are to have access and the type of access to the document for reviewing, editing and approving the document. This is usually the responsibility of a Quality Assurance team/committee. The employee who has created the new document record will be automatically entered on this list. This employee can be removed if necessary, click on the employee and press the <Delete> key on the keyboard. To add more employees to this list, press the <↓> (arrow down) key on the keyboard to insert a new line or right-mouse click on the existing line and select “Insert Row” from the pop-up list. On the new line click in the “Pos” field and press <F2>, select employees from the pop-up list and click OK.

Click in the access columns to allocate the different option to each individual employee. (See below) Related document filepaths may also be stored in this window. Press <F9> to save.

After saving for the first time the “Access” tab has an added column called “Location”, this field refers to the location of the document. The user can enter instruction on where to find the original (hard copy) of the document. (Example – main office, top shelf, Policies and Procedures Folder).
To print the distribution list, re-open the record and click on the Print icon.

A message will appear, click on Yes.

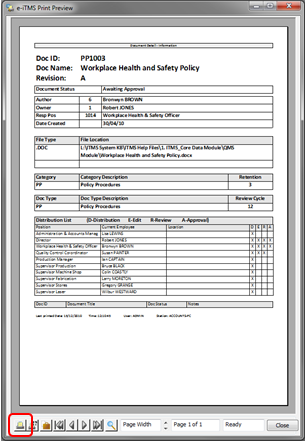
The Print Preview window opens to display the Distribution List.

Click on the Print icon, located at the bottom left of the window.
Last Revised: 09/03/2012 SJ